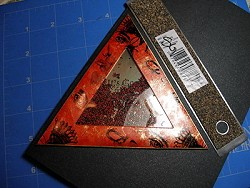
Triangle Shaker Card

By Suzanne Glazier
Supply List:
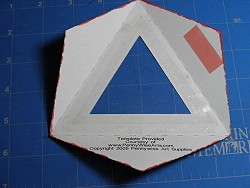
- Triangle Template - cut out of cardstock (I usually use white or vanilla)
[Template for 5 3/4" Card]
[Template for 6" Card Base]
[Triangle Envelope Template 1]
[Triangle Envelope Template 2] - Acetate
- Double Sided Foam Tape
- O'So Sticky Double Sided Adhesive
- Glass Micro Beads
- Scissors
- Stamps & Inks of choice
- Coordinating cardstock
- Cutting mat and knife
- Straight edge (ruler)
- Scoring Tool
- Used Dryer sheet for static cling combat duty

NOTES:
Due to the nature of this project, it specifically requires the use of O'So Sticky Tape [sold here] to insure that the card does not come apart. Use of a lighter weight adhesive is not advised.
TIPS:
It is important that you print the template with "NO SCALING" to get the correct size and proportions. When you open the template in Adobe, click on FILE and then PRINT, up comes the print menu. About half way down is the title PAGE SCALING. There should be at least three options here: None, Fit to Page and Shrink Larger Pieces. You want to select NONE and then click OKAY to print.
If your template was printed properly, your actual triangle shaker card (once folded up) should be 5 3/4" from corner to corner.
Directions:
Step 1:
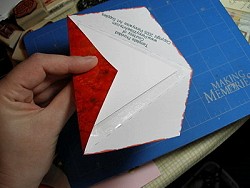
Print out the Triangle Shaker Card template onto CARDstock paper. Your paper can be plain, or it can be a decorative paper, but I highly suggest that you use CARDstock to achieve the best results! If you use a decorative cardstock, be sure that you print the template onto the BACK side of the paper!! Same goes with glossy cardstock - you want it to print on the side that is NOT glossy!
NOTE:
Your shaker card template is comprised of two pieces. One is the large piece that will be come your shaker. The other is a simple triangle to be used for cutting the acetate as well as the backing that will go inside your card (and be seen through the window).
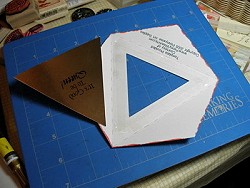
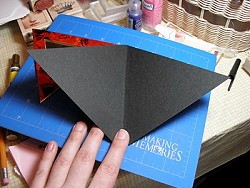
Cut shaker template from cardstock, cut out center. Score all fold lines. Cut a triangle from cardstock and a triangle from acetate plastic. (The triangle template next to your shaker template will give you the perfect size for both! )
Step 2:
Now it's time to decorate the FRONT side of your shaker. You do this simply by stamping your design onto the side of the template WITHOUT the lines on it!
You will also want to stamp one side of the cardstock triangle piece now as well (you will see this through the window of your card.)
Due to the nature of this project, it specifically requires the use of O'So Sticky Tape [sold here] to insure that the card does not come apart. Use of a lighter weight adhesive is not advised.
TIPS:
It is important that you print the template with "NO SCALING" to get the correct size and proportions. When you open the template in Adobe, click on FILE and then PRINT, up comes the print menu. About half way down is the title PAGE SCALING. There should be at least three options here: None, Fit to Page and Shrink Larger Pieces. You want to select NONE and then click OKAY to print.
If your template was printed properly, your actual triangle shaker card (once folded up) should be 5 3/4" from corner to corner.
Directions:
Step 1:
Print out the Triangle Shaker Card template onto CARDstock paper. Your paper can be plain, or it can be a decorative paper, but I highly suggest that you use CARDstock to achieve the best results! If you use a decorative cardstock, be sure that you print the template onto the BACK side of the paper!! Same goes with glossy cardstock - you want it to print on the side that is NOT glossy!
NOTE:
Your shaker card template is comprised of two pieces. One is the large piece that will be come your shaker. The other is a simple triangle to be used for cutting the acetate as well as the backing that will go inside your card (and be seen through the window).
Cut shaker template from cardstock, cut out center. Score all fold lines. Cut a triangle from cardstock and a triangle from acetate plastic. (The triangle template next to your shaker template will give you the perfect size for both! )
Step 2:
Now it's time to decorate the FRONT side of your shaker. You do this simply by stamping your design onto the side of the template WITHOUT the lines on it!
You will also want to stamp one side of the cardstock triangle piece now as well (you will see this through the window of your card.)
Step 3:
Place a small piece of O'So Sticky Tape on the BACK side of just one of the tab closures on your shaker card. This is a great time to get out those scraps of O'So that you've been saving and wondering what to do with! :0)
Remove the liner from the O'So piece.
Now, place your stamped triangle behind the window with the design facing out through the window and align it where you want it to be.

Step 4:
Then fold over the sticky tab so that the tape catches it. Now it will be perfectly aligned when you are done!
Then fold over the sticky tab so that the tape catches it. Now it will be perfectly aligned when you are done!
Step 5:
On the back (undecorated) side of the template place pieces of O'So Sticky Tape (scraps or other) all the way around the window. Overlap if you must but do not leave any gaps or your beads WILL spill out later! (or sooner!)
On the back (undecorated) side of the template place pieces of O'So Sticky Tape (scraps or other) all the way around the window. Overlap if you must but do not leave any gaps or your beads WILL spill out later! (or sooner!)
Step 6:
Place the acetate 'window' triangle piece on top of double sided tape. Rub down to adhere. Don't worry if it isn't completely covering the tape.
Tip: To fight static cling inside your shaker, spray glass cleaner onto a paper towel and wipe it over both sides of your acetate. OR simply wipe the acetate on both sides with a USED dryer sheet!
Step 7:
Place three lengths of foam mounting tape on top of acetate. Try to make sure pieces touch on all corners to form a box surrounding the window. If you are experienced at mitering corners - now would be a good time to do that - otherwise, don't fret - as long as the foam tape touches all the way around the window without any gaps, you'll be fine!!
Take the liner off of the foam tape now.
Step 8:
CAREFULLY add micro beads to the inside of the shaker. Use LESS than you think you need! There should be enough room for the beads to shake back and forth when it is put together but if you put too many, it will cover your image completely and you'll be sad! I like to visualize it 1/3 full - that usually is the perfect amount for me. Error on the side of caution here - if it looks like too much before you even close the back, it probably is!! Fish some out by pressing your finger into them (they'll stick to it)!
Step 9:
Fold the tab with the triangle cardstock attached to it in and secure to the sticky foam by pressing firmly all the way around.
Once you close the back on the beads there are no do overs!! O'So is permanent and will ruin the card if you try to pull it back up!!
Now add pieces of O'So to the other tabs and fold in and secure. Your tabs should all meet up exactly on the back of the shaker.
Step 10:
Putting the shaker on a card is easy! Fold a piece of cardstock in half. Lay one edge of your shaker window about 1/4" away from the fold - lining it up straight! In the photo, my fold is on the left side of my card.
Lightly mark the cardstock with a pencil on the other two sides of the shaker. Now draw a line approximately 1/4" out from those two lines to create a larger triangle 'card'. Cut this out - but NOT on the fold side to create a card that opens!
Step 11:
Now mount your shaker to the center of the card with O'So and send it in the mail to someone you love! :0)
Now mount your shaker to the center of the card with O'So and send it in the mail to someone you love! :0)

Step 12:
Note: Thanks to Connie Babbert for providing the first shaker box class on PWA in 2003!! It has been the inspiration for all the shakers that followed!! :0)
Note: Thanks to Connie Babbert for providing the first shaker box class on PWA in 2003!! It has been the inspiration for all the shakers that followed!! :0)
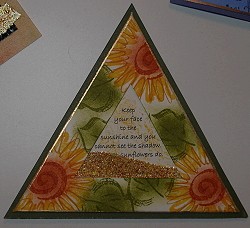
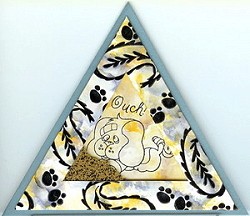
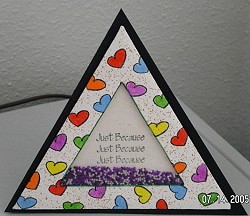
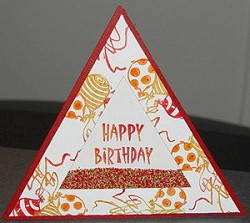
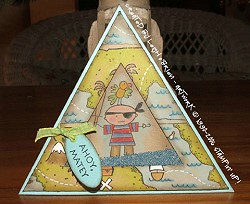
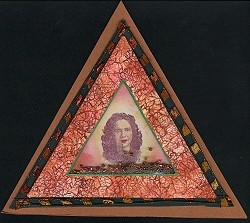
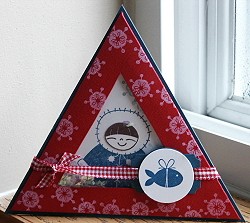
Examples
 (Small) (Small).jpg)
Jean Marchand
Melissa Baldwin
Kim D.
Jen Caputo
 By Evelyn.jpg)
Evelyn Spikes
Leigh O'Brien
Laura Favre
Jane Bosi