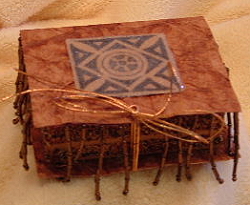
Box Drawer Books

By Shona Watson
Supply List:
- 1 - 4.5" x 5" piece of cardstock
(this will be the inside drawer part) - 1 - 3.5" x 7" piece of cardstock
(this will be the outside cover part) - 1 - 2.5" x 3" piece of cardstock
(this will be a layer on the top) - 1 - 2.25" x 2.75" piece of cardstock
(this will another layer on the top) - 2 eyelets
- 14" piece of ribbon or cord
- O'So Sticky Tape
- Clear Micro Beads
Merrie Burruss

Directions:
Step 1:
Score 4.5" x 5" piece on all sides at 1".
Step 2:
Hold the card stock in your hand with the shorter sides being on the top and bottom. See the little squares in each corner you've made after scoring?? On the bottom side, cut along the scored line of the little box - this should just be a 1" cut. Make a cut on one side of each of the four boxes.
Step 3:
After you have all of the slits cut, fold on all of the scored lines. Fold up each of the longer sides and place the little squares inward, slap on some O'So and fold up the ends and you have yourself the little drawer!
Step 4:
Score 3.5" x 7" piece at 2 7/8" and 4" on the long side.
Step 5:
You should now be able to fold on the 2 7/8" and 4" score lines and form the little "book" part that fits around the drawer.
Step 6:
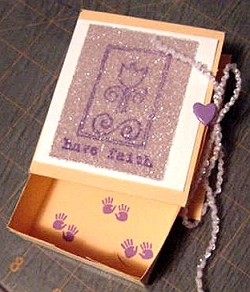
The 2.5" x 3" layer and 2.25" x 2.75" layer are for the front cover. You may stamp and bead those as you like! Also stamp a greeting or sentiment on the inside of your drawer if you like.
Step 7:
Now add the eyelet and cord to tie it together! When I'm doing the eyelets, I punch the hole in the front part where I want it and then fold it together and use a little pencil mark in the middle of the hole to mark where to punch the hole on the back part. That way it won't be lopsided like the first few that I made!! Loop cord or ribbon through both eyelets and tie a bow on the outside. Insert your drawer into your book and TA DA!!!!
Step 1:
Score 4.5" x 5" piece on all sides at 1".
Step 2:
Hold the card stock in your hand with the shorter sides being on the top and bottom. See the little squares in each corner you've made after scoring?? On the bottom side, cut along the scored line of the little box - this should just be a 1" cut. Make a cut on one side of each of the four boxes.
Step 3:
After you have all of the slits cut, fold on all of the scored lines. Fold up each of the longer sides and place the little squares inward, slap on some O'So and fold up the ends and you have yourself the little drawer!
Step 4:
Score 3.5" x 7" piece at 2 7/8" and 4" on the long side.
Step 5:
You should now be able to fold on the 2 7/8" and 4" score lines and form the little "book" part that fits around the drawer.
Step 6:
The 2.5" x 3" layer and 2.25" x 2.75" layer are for the front cover. You may stamp and bead those as you like! Also stamp a greeting or sentiment on the inside of your drawer if you like.
Step 7:
Now add the eyelet and cord to tie it together! When I'm doing the eyelets, I punch the hole in the front part where I want it and then fold it together and use a little pencil mark in the middle of the hole to mark where to punch the hole on the back part. That way it won't be lopsided like the first few that I made!! Loop cord or ribbon through both eyelets and tie a bow on the outside. Insert your drawer into your book and TA DA!!!!
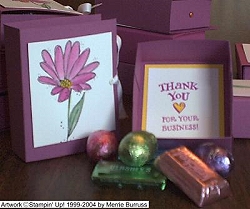
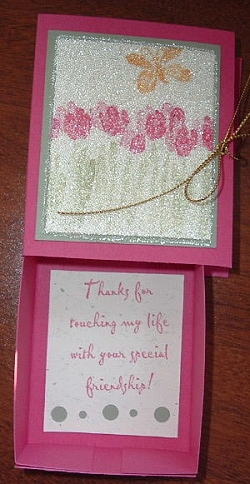
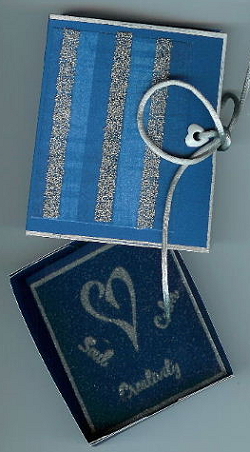
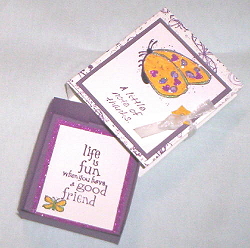
Examples
Camela Gertner
Evelyn Spikes
Jean
Evelyn Spikes
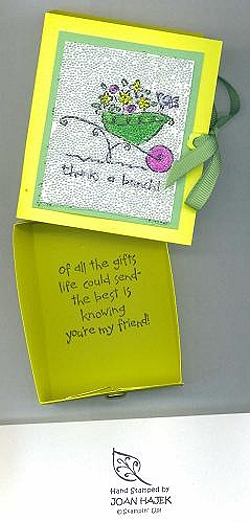
Joan Hajek
Linda Bohrn