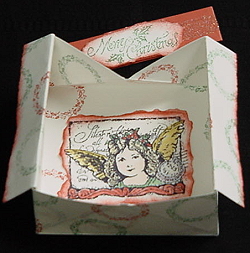
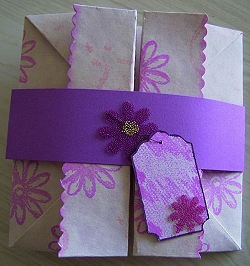
Box Card

By Karen Gibson
Supply List:
- PWA Clear Micro Beads
- O'So Sticky Tape
- Glitter
- Rubber Stamps
- Ink
- Decorative Scissors
- One Sheet of Cardstock
- Contrasting Color Cardstock
- Scraps of cardstock for layering inside stamped image
- Stamping Sponges

Directions:
NOTES:
Here is a video tutorial from www.StampingVideos.com to assist you with folding [SEE VIDEO HERE]
In order to assist you with this class you can go to the above site and follow along with my instructions. The site has drawings of how the folds are done.
You may wish to try this fold out on plain typing paper until you get the hang of the folds. If you are brave then go ahead and start with step 1. Use a bone folder for all the creases. The box card will look better if your creases are sharp.
Step 1:
Stamp front and back of 8 1/2 x 11 cardstock. I recommend using a lighter weight cardstock. White or vanilla cardstock works fine for this project.
Step 2:
Lightly mark the center points. Do this on the 11 inch sides. Use pencil you can erase the marks later. Turn your cardstock over and lightly mark a dot in the center of the cardstock.
Step 3:
Fold the bottom up to the center dot that was made in step 2. Use a bone folder to make the creases sharp. Repeat with the top part of the cardstock. Unfold the cardstock and lay flat. Turn the cardstock over. The two marks of the center point you first made are now facing you.
Step 4:
Take your left hand and pull the left top corner of the cardstock down towards the center. Take care only to crease using the bone folder from the top point to the fold line that was made in step 3. Use your right hand to take the right top corner of the cardstock pull towards the center. Again only crease from the top point to the fold line that was made in step 3. Unfold and lay flat. Turn cardstock around and repeat step 4. Unfold.
Note: Step 4 on the website link tells you to fold both corners in at the same time. You can do this if it is easier for you. I like taking one corner at a time to make the fold.
Step 5:
Mark the four points that were made at step 4. If step 4 was correctly done you will see two triangle shapes one on the top section, and one on the bottom section of the cardstock now facing you. These marks will help you with the next two folds. Turn cardstock over.
Step 6:
Use your left hand and fold up the 8 1/2 side and stop when you see the two dots you marked in step 5. Repeat on the other side of the card stock. After the 8 1/2 sides are creased open and lay cardstock flat. If you completed this correctly you will see a square shape around the center dot. This is the bottom of the box card.
Step 7:
Using fold lines made in step 3, bring up top and bottom 11 inch sides to the center dot. Using your left hand bring up 8 ½ side of cardstock and fold down, crease. Your cardstock should look like half of a stop sign. Fold in the top and bottom part of your stop sign towards each other till they meet. Now take the flap and fold towards your left. Turn cardstock around and repeat for the other side. If you have completed this step correctly, you can now open your box by pulling the flaps apart.
Step 8:
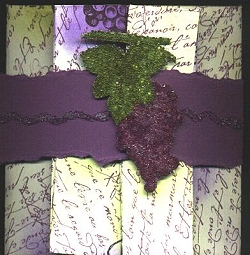
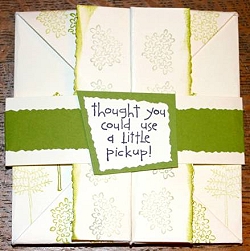
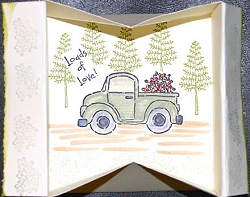
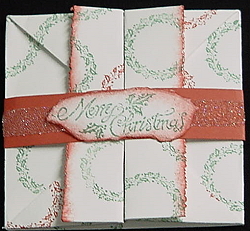
Making the band for your box card. Cut a strip of contrasting cardstock. This will measure 9 1/2 inches long by 1 1/4 inches wide. Score this piece at 2 inches and again at 6 1/2 inches. Tape short ends together to form the band. The decorating is up to you! I used clear micro beads and glitter on O'So sticky tape. Then added another torn edge of cardstock stamped with a word stamp. For the inside of the box card you can add additional stamped images. Try using dimensionals to add depth to the inside of the box. You can fill the box with small items. I've sent charms, and small candy in the box. Paper punches, and confetti are also good to put in the box card.
NOTES:
Here is a video tutorial from www.StampingVideos.com to assist you with folding [SEE VIDEO HERE]
In order to assist you with this class you can go to the above site and follow along with my instructions. The site has drawings of how the folds are done.
You may wish to try this fold out on plain typing paper until you get the hang of the folds. If you are brave then go ahead and start with step 1. Use a bone folder for all the creases. The box card will look better if your creases are sharp.
Step 1:
Stamp front and back of 8 1/2 x 11 cardstock. I recommend using a lighter weight cardstock. White or vanilla cardstock works fine for this project.
Step 2:
Lightly mark the center points. Do this on the 11 inch sides. Use pencil you can erase the marks later. Turn your cardstock over and lightly mark a dot in the center of the cardstock.
Step 3:
Fold the bottom up to the center dot that was made in step 2. Use a bone folder to make the creases sharp. Repeat with the top part of the cardstock. Unfold the cardstock and lay flat. Turn the cardstock over. The two marks of the center point you first made are now facing you.
Step 4:
Take your left hand and pull the left top corner of the cardstock down towards the center. Take care only to crease using the bone folder from the top point to the fold line that was made in step 3. Use your right hand to take the right top corner of the cardstock pull towards the center. Again only crease from the top point to the fold line that was made in step 3. Unfold and lay flat. Turn cardstock around and repeat step 4. Unfold.
Note: Step 4 on the website link tells you to fold both corners in at the same time. You can do this if it is easier for you. I like taking one corner at a time to make the fold.
Step 5:
Mark the four points that were made at step 4. If step 4 was correctly done you will see two triangle shapes one on the top section, and one on the bottom section of the cardstock now facing you. These marks will help you with the next two folds. Turn cardstock over.
Step 6:
Use your left hand and fold up the 8 1/2 side and stop when you see the two dots you marked in step 5. Repeat on the other side of the card stock. After the 8 1/2 sides are creased open and lay cardstock flat. If you completed this correctly you will see a square shape around the center dot. This is the bottom of the box card.
Step 7:
Using fold lines made in step 3, bring up top and bottom 11 inch sides to the center dot. Using your left hand bring up 8 ½ side of cardstock and fold down, crease. Your cardstock should look like half of a stop sign. Fold in the top and bottom part of your stop sign towards each other till they meet. Now take the flap and fold towards your left. Turn cardstock around and repeat for the other side. If you have completed this step correctly, you can now open your box by pulling the flaps apart.
Step 8:
Making the band for your box card. Cut a strip of contrasting cardstock. This will measure 9 1/2 inches long by 1 1/4 inches wide. Score this piece at 2 inches and again at 6 1/2 inches. Tape short ends together to form the band. The decorating is up to you! I used clear micro beads and glitter on O'So sticky tape. Then added another torn edge of cardstock stamped with a word stamp. For the inside of the box card you can add additional stamped images. Try using dimensionals to add depth to the inside of the box. You can fill the box with small items. I've sent charms, and small candy in the box. Paper punches, and confetti are also good to put in the box card.
Examples
Karen Gibson
Karen Gibson
Karen Gibson
Karen Gibson
box card

box card